Attivazione dell'autenticazione SSL mutua
Cos'è l'autenticazione reciproca?
Molte persone si aspettano una sicurezza extra e l'autenticazione reciproca è già supportata in Terminal Service Plus. Di solito è implementata da banche o enti governativi.
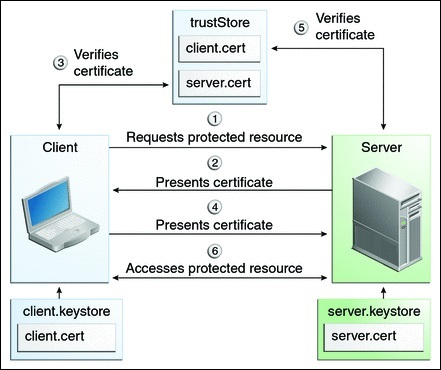
Per capire di cosa si tratta, possiamo paragonarlo a un processo SSL standard in cui aggiungerai un controllo extra per verificare se il browser web dell'utente consente la connessione SSL. Sai qual è il tuo certificato SSL lato server. Immagina che il certificato sia importato nel browser web per garantire che questo specifico browser web sia considerato affidabile per creare una connessione. Nel primo passo della comunicazione, il browser web agisce come un client e nel secondo passo, è il contrario. Alla fine, entrambi i lati, il browser web del client e il server web, hanno accettato l'autorità e la connessione può iniziare.
Una definizione più completa: L'autenticazione SSL mutua o l'autenticazione mutua basata su certificato si riferisce a due parti che si autenticano reciprocamente verificando il certificato digitale fornito, in modo che entrambe le parti siano sicure dell'identità dell'altra. In termini tecnologici, si riferisce a un client (browser web o applicazione client) che si autentica a un server (sito web o applicazione server) e quel server che si autentica anche al client verificando il certificato della chiave pubblica/certificato digitale emesso dalle Autorità di Certificazione (CA) fidate. Poiché l'autenticazione si basa su certificati digitali, le autorità di certificazione come Verisign o Microsoft Certificate Server sono una parte importante del processo di autenticazione mutua.

Attivandolo su TSplus
Il server web integrato di TSplus consente di configurare l'autenticazione reciproca.Per abilitare l'autenticazione reciproca seguire questo processo:
Dovrai installare l'ultima versione del Java Development Kit (JDK), disponibile presso http://java.com > Download > JDK.
- Crea e modifica con Notepad il seguente file: C:\Program Files (x86)\TSplus\Clients\webserver\settings.bin
Aggiungi queste 3 righe:
disable_http_only=true disable_print_polling=true force_mutual_auth_on_https=true
- Rimuovi cert.jks
In “C:\Program Files (x86)\TSplus\Clients\webserver” vedrai il file cert.jks Copialo in “C:\Program Files (x86)\TSplus\Clients” Rimuovi “C:\Program Files (x86)\TSplus\Clients\webserver\cert.jks”
- Crea il file batch
In ‘C:\Program Files (x86)\TSplus\Clients’ crea un file batch, ad esempio “createcertuser.bat” con queste impostazioni:
@rem decommenta la riga successiva, se vuoi generare un nuovo certificato autofirmato cert.jks @rem keytool -genkey -v -alias jwts -keyalg RSA -validity 3650 -keystore cert.jks -storepass secret -keypass secret -dname “CN=localhost, OU=my_ou, O=my_org, L=my_city, ST=my_state, C=MY” @keytool -genkey -v -alias AliasUser1 -keyalg RSA -storetype PKCS12 -keystore forBrowserUser1.p12 -dname “CN=some_name, OU=some_ou, O=some_org, L=Parigi, ST=FR, C=FR” -storepass mypassword -keypass mypassword @keytool -export -alias AliasUser1 -keystore forBrowserUser1.p12 -storetype PKCS12 -storepass mypassword -rfc -file forCertUser1.cer @keytool -alias AliasCertUser2 -import -v -file forCertUser1.cer -keystore cert.jks -storepass secret @del forCertUser1.cer
Questo importerà automaticamente la coppia di chiavi del certificato dal browser web in "cert.jks" dopo aver creato la sua coppia di chiavi del browser.
- Ripristina il nuovo "cert.jks" modificato creato.
Copia “C:\Program Files (x86)\TSplus\Clients\cert.jks” in “C:\Program Files (x86)\TSplus\Clients\webserver” e riavvia i server web.
- Importazione e test del certificato
L'esempio di batch fornito dovrebbe aver generato un file di test “BrowserUser1.p12”. Quando aprirai l'indirizzo HTTPS, riceverai un messaggio di sicurezza e non potrai accedere alle pagine del Web Server. Con Chrome o IE, puoi fare clic su questo file ‘BrowserUser1.p12’ per importare il certificato nel keystore predefinito di Windows. Con FireFox, devi andare su Impostazioni e importare questo file “BrowserUser1.p12” nella tua cartella dei certificati.
Non appena l'hai importato correttamente, sarai in grado di accedere all'indirizzo HTTPS.
L'amministratore può creare un file di coppia di chiavi separato per ogni utente.
Ad esempio:
forBrowserUser1.p12 forBrowserUser2.p12 forBrowserUser3.p12
E può esportare questi certificati in cert.jks. Se desidera disabilitare l'accesso a un utente, dovrà semplicemente eliminare questo utente da "cert.jks". In questo modo, l'utente perderà la sua autorizzazione e non potrà più accedere al server web.
Questa autenticazione reciproca influisce solo sulle connessioni HTTPS e la connessione HTTP sarà vietata con la riga di comando: settings.bin>disable_http_only=true