Pagine HTML e personalizzazione
Puoi modificare le pagine HTML fornite con Notepad o Notepad++ per personalizzare l'interfaccia utente.
pagina index.html
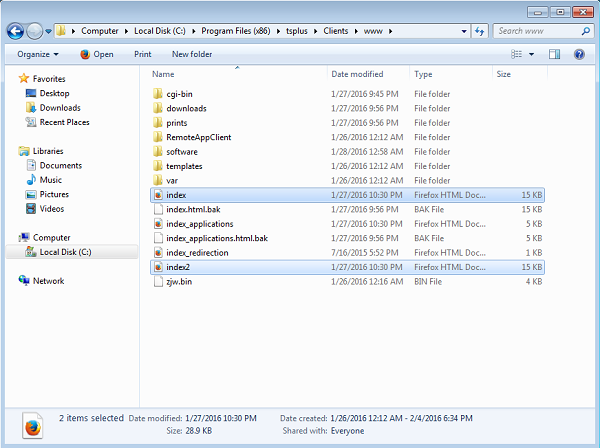
Il file index.html si trova nel percorso della cartella radice del server Web.
C:\Program Files (x86)\TSplus\Clients\www
La pagina Index.html è la pagina web predefinita. È come una pagina del Portale front-end con collegamenti alle pagine di connessione che si trovano nella cartella \www\. Questa pagina web può essere copiata e rinominata per consentire più configurazioni e/o informazioni di accesso. Ad esempio, copiamo e rinominiamo index.html in index2.html, questa pagina sarà disponibile utilizzando questo url. http://localhost/index2.html

Attenzione che se cambi il nome del file “index.html” in “index2.html” e stai utilizzando il Portale delle Applicazioni Web, allora devi cambiare la seguente variabile in questo file: “page_configuration[“applications_portal”] = “index_applications.html” in “index2_applications.html” e poi rinomina il file “index_applications.html” in “index_2applications.html”.
Il file index.html predefinito include tutte le opzioni possibili:
- Accesso RemoteApp alle applicazioni, connessione al di fuori del Web Browser
- Connessione tramite HTML5 da qualsiasi dispositivo
- Preferenze di stampa locali
Sarai in grado di modificare intestazione e piè di pagina nella funzione di design del portale web nella scheda delle preferenze del portale web.
Modificando la pagina web index.html, avrai accesso a varie impostazioni.
// --------------- Configurazione Accesso --------------- var user = ""; // Login da utilizzare quando ci si connette al server remoto (lasciare "" per utilizzare il login digitato in questa pagina) var pass = ""; // Password da utilizzare quando ci si connette al server remoto (lasciare "" per utilizzare la password digitata in questa pagina) var domain = ""; // Dominio da utilizzare quando ci si connette al server remoto (lasciare "" per utilizzare il dominio digitato in questa pagina) var server = “127.0.0.1”; // Server a cui connettersi (lasciare "" per utilizzare localhost e/o il server scelto in questa pagina) var port = ""; // Porta a cui connettersi (lasciare "" per utilizzare localhost e/o la porta del server scelto in questa pagina) var lang = “as_browser”; // Lingua da utilizzare var serverhtml5 = “127.0.0.1”; // Server a cui connettersi, quando si utilizza il client HTML5 var porthtml5 = “3389”; // Porta a cui connettersi, quando si utilizza il client HTML5 var cmdline = ""; // Testo opzionale che verrà inserito negli appunti del server una volta connessi // --------------- Fine della Configurazione Accesso ---------------
Ad esempio, imposterò demo/Psw come login/password modificando: var user = “Demo”; var pass = “Psw”;
Facendo così, le credenziali precompilate diventano visibili ad ogni visita del portale.
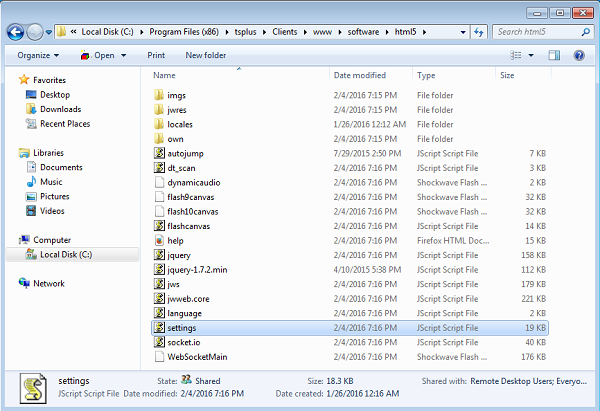
Un altro file di configurazione molto importante è settings.js , situato in C:\Program Files (x86)\TSplus\Clients\www\software\html5:

Questo file contiene varie impostazioni per il client web HTML5, come disabilitare il suono, il copia e incolla o consentire la riconnessione della sessione se la scheda del browser è chiusa.
- Disabilitazione degli appunti:
W.clipboard = "sì"; //o "no"
- Disabilitare il suono è fatto con questa impostazione:
W.playsound = false;
- Cambiando la risoluzione predefinita per i dispositivi mobili:
W.viewportwidth = "1024" - L'altezza viene calcolata dal browser.
- Forzare HTTPS per la connessione remota
W.forcealways_ssl = true;
- Consenti la riconnessione della sessione quando la scheda del browser è chiusa:
W.send_logoff = false;
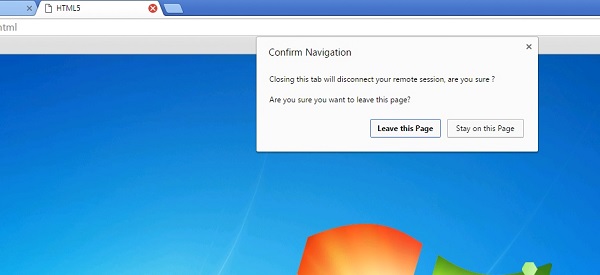
- Aggiungere un avviso pop-up per prevenire la chiusura della scheda del browser:
cerca il parametro “W.pageUnloadMessage = "" ”.
Ho impostato un esempio di messaggio da utilizzare qui sotto :
W.pageUnloadMessage = "Chiudere questa scheda disconnetterà la tua sessione remota, sei sicuro ?"; //Dialogo da restituire quando la pagina viene chiusa. //1. Avviso importante, i dialoghi personalizzati non sono supportati in tutti i browser. //2. Lo standard HTML non distingue tra l'azione di aggiornamento della pagina e quella di chiusura della pagina, il dialogo apparirà anche durante l'aggiornamento della pagina.

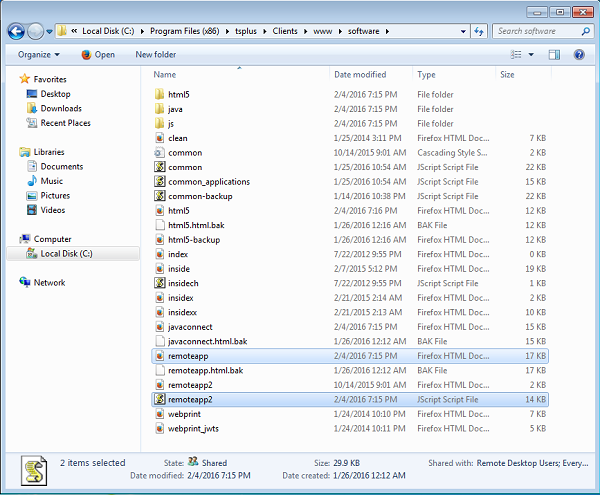
Le impostazioni generali per la pagina web RemoteApp sono memorizzate nella cartella del software, in due file diversi: remoteapp.html e remoteapp2.js .

Esempio delle impostazioni disponibili presenti in remoteapp2.js :
// Server Desktop Remoto var remoteapp2_server = ”; var remoteapp2_port = ‘443’;
// Autenticazione di Windows var remoteapp2_user = ”; var remoteapp2_psw = ”; var remoteapp2_domain = ”;
// Parametri della riga di comando opzionali var remoteapp2_apppath = ”;
// Modalità Seamless/RemoteApp var remoteapp2_wallp = 'verde'; var remoteapp2_seamless = 'spento'; var remoteapp2_remoteapp = 'acceso';
// Schermo var remoteapp2_color = '32'; var remoteapp2_full = '2'; var remoteapp2_width = ''; var remoteapp2_height = ''; var remoteapp2_scale = '100'; var remoteapp2_smartsizing = '1'; var remoteapp2_dualscreen = 'off'; var remoteapp2_span = 'off';
// Mappatura dei dischi (richiesta per la stampa) var remoteapp2_disk = ‘1’;
// Stampa var remoteapp2_printer = 'spento'; var remoteapp2_preview = 'spento'; var remoteapp2_default = 'acceso'; var remoteapp2_select = 'spento';
// Hardware var remoteapp2_com = '0'; var remoteapp2_smartcard = '0'; var remoteapp2_serial = 'spento'; var remoteapp2_usb = 'spento'; var remoteapp2_sound = 'acceso'; var remoteapp2_directx = 'spento';
// Varie var remoteapp2_alttab = '0'; var remoteapp2_firewall = '1'; var remoteapp2_localtb = '32'; var remoteapp2_lock = 'off'; var remoteapp2_rdp5 = 'off'; var remoteapp2_reset = 'off';